 rumaruma
How to Read a Renovation Floor Plan: A Malaysian Homeowner’s Guide to Symbols, Measurements and Layouts
Your ID just sent the layout plan for sign-off — here’s how to read a floor plan properly so the home you approve on paper is the home you actually get.
On this page
- Why the Floor Plan Matters More Than the 3D Render
- The Drawings You’ll Actually Receive
- How to Read a Floor Plan: Scale, Units and Measurements
- Floor Plan Symbols Every Malaysian Homeowner Should Know
- What to Check on the Proposed Layout Plan
- Reading the Electrical and Ceiling Plans
- Approvals: Who Else Reads Your Floor Plan
- For Carpenters and Renovators
- Before You Sign Off: A Floor Plan Checklist
The PDF lands in your WhatsApp at 11pm. “Please review and confirm layout so we can proceed.” You open it, pinch-zoom across a grid of thin lines, tiny numbers and symbols that look like Wi-Fi icons — and reply “Looks good!” because the 3D render you saw last week looked lovely.
Three months later, the fridge door hits the kitchen wall, the bedroom socket sits behind the wardrobe, and the walkway past the island is barely wide enough for one person carrying a wok. All of it was on the drawing. Nobody pointed it out.
Learning how to read a floor plan takes one evening, not an architecture degree. This guide walks through the drawings your Malaysian ID or contractor will send, what every line and number means, and the checks that catch expensive mistakes while they’re still free to fix.

Why the Floor Plan Matters More Than the 3D Render
A 3D render shows you the mood. The floor plan shows you the truth.
Renders are built to sell an idea — the camera angle is chosen, the furniture is often scaled down, and the walkways look generous because you’re seeing them from above a doorway. The floor plan is what your carpenter, electrician and tiler actually build from. If the render and the plan disagree, the plan wins on site.
That’s why signing off a layout is one of the most important moments in a renovation. Once hacking starts, every change becomes a variation order — and moving a wall, a sink or a power point after the fact costs real money. Rerouting a single power point after plastering typically runs RM150–RM350 once you add the patch-up and repaint. Moving a kitchen sink after the wet works are done can run into the thousands.
The Drawings You’ll Actually Receive
Most Malaysian ID or design-and-build firms send a drawing set rather than a single floor plan. Expect some or all of these:
| Drawing | What it shows | What to check |
|---|---|---|
| Existing layout plan | The unit as it is today, usually traced from the developer’s plan | That it matches your actual unit, including any past changes |
| Hacking / demolition plan | Walls, tiles and built-ins to be removed | Which walls go — and whether any are structural |
| Proposed layout plan | New walls, furniture, built-ins and room arrangement | Walkways, door swings, furniture fit |
| Electrical / lighting point plan | Power points, switches, lights, fan and aircon points | Heights, positions, quantities against the quotation |
| Reflected ceiling plan (RCP) | Plaster ceiling, L-box, cove lighting, downlights, ceiling fans | Ceiling drops, light spacing, fan clearance |
| Plumbing plan | Water inlets, drainage points, floor traps, water heater | Sink and washer positions, floor trap locations |
| Carpentry elevations | Front views of cabinets, wardrobes, TV console | Heights, depths, internal layout, appliance gaps |
You don’t need to master all of them at once. Start with the proposed layout and the electrical plan — those two account for most of the regrets we hear about.
How to Read a Floor Plan: Scale, Units and Measurements
Before you look at any room, look at the corner of the drawing. The title block tells you the project, the drawing name, the revision number and the scale.
Scale
Malaysian residential drawings are usually at 1:50 (detailed rooms) or 1:100 (whole unit). At 1:50, 1cm on a printed A3 sheet equals 50cm in real life. If you’re reading on your phone, the scale is meaningless — trust the written dimensions instead.
Units
Dimensions on Malaysian renovation drawings are almost always in millimetres, written without a unit. So “2400” means 2.4 metres, not 2,400 inches.
Developer brochures and property listings, on the other hand, quote area in square feet. A few conversions worth keeping handy:
- 1 metre = 3.28 ft
- 1 square metre = 10.76 sq ft
- 300mm ≈ 1 ft (the quick mental shortcut most carpenters use)
Dimension lines
A dimension line is a thin line with small ticks or arrows at both ends and a number above it. Read it as the distance between the two ticks. Chains of dimensions along a wall add up to the overall length — if they don’t, ask why.
Watch for whether a dimension is measured to the finished wall or the structural wall. Plaster and tiles add 15–25mm per face, which matters when you’re squeezing a 600mm-wide fridge into a 610mm gap.
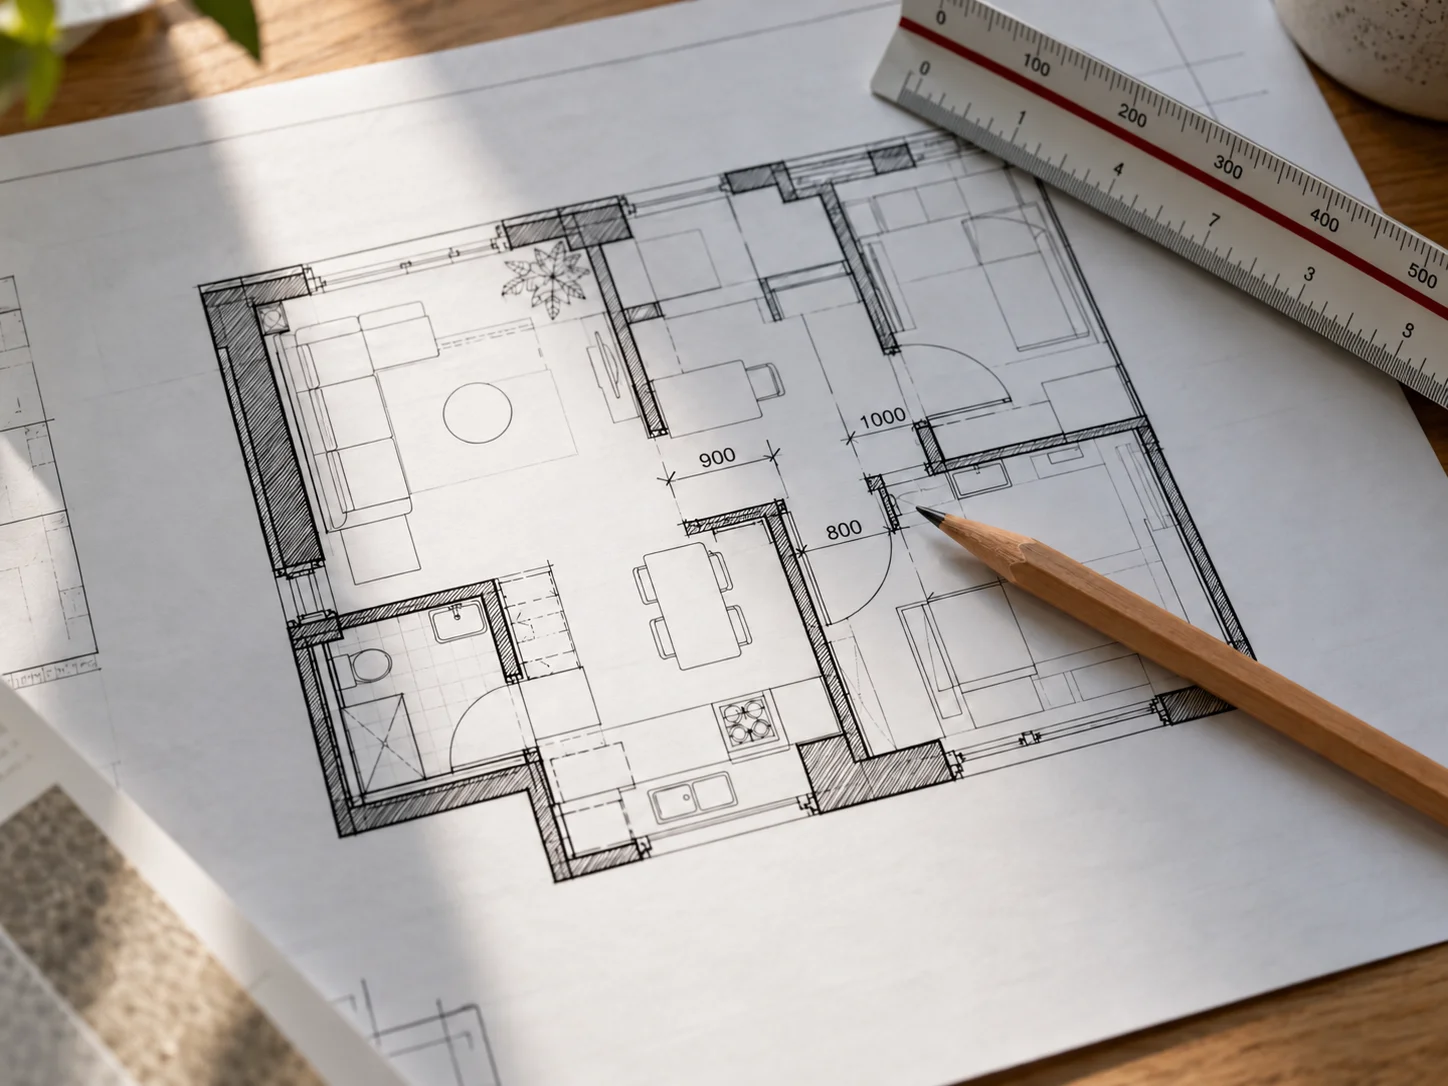
Floor Plan Symbols Every Malaysian Homeowner Should Know
Symbols vary slightly between firms, and every drawing set should include a legend. These are the ones you’ll see most often.
Walls
- Thick solid or hatched walls — existing walls to remain. In condos, many of these are reinforced concrete (RC) walls that cannot be hacked.
- Dashed walls — walls to be demolished (on the hacking plan).
- Walls with a different hatch or fill — new walls, usually brick or drywall (gypsum board) partitions. The legend tells you which.
Doors and windows
- Swing doors are drawn as a straight line with a quarter-circle arc. The arc shows exactly which way the door opens and how much floor space it sweeps.
- Sliding doors appear as two thin overlapping lines inside the wall opening.
- Windows are thin parallel lines (usually two or three) set within the wall thickness.
Kitchen, bathroom and laundry
- Rectangles with a circle for sinks and basins; four small circles for a hob.
- A small square with an X or a circle marks a floor trap — the drain point in wet areas.
- “FFL” means finished floor level. A note like “FFL −25” in a bathroom means that floor sits 25mm lower than the main floor, which helps keep shower water from creeping out.
Electrical and lighting
| Symbol (typical) | Meaning |
|---|---|
| Circle with two short lines | 13A switched socket outlet |
| Same, labelled “15A” | Heavy-load point — water heater, oven |
| Small “S” or circle with a tail | Light switch (2W = two-way switch) |
| Circle with a cross | Light point or downlight |
| Circle with fan blades or “CF” | Ceiling fan point |
| “AC” or “A/C” with a box | Aircon point (indoor unit) |
| Triangle or “TV”/“DP” | TV or data point |
Next to each symbol you’ll often see a height, such as “@300” or “@1100AFF” — that’s the height in millimetres above finished floor. Standard socket height in Malaysian homes is around 300mm; above a kitchen counter it’s usually around 1100mm.
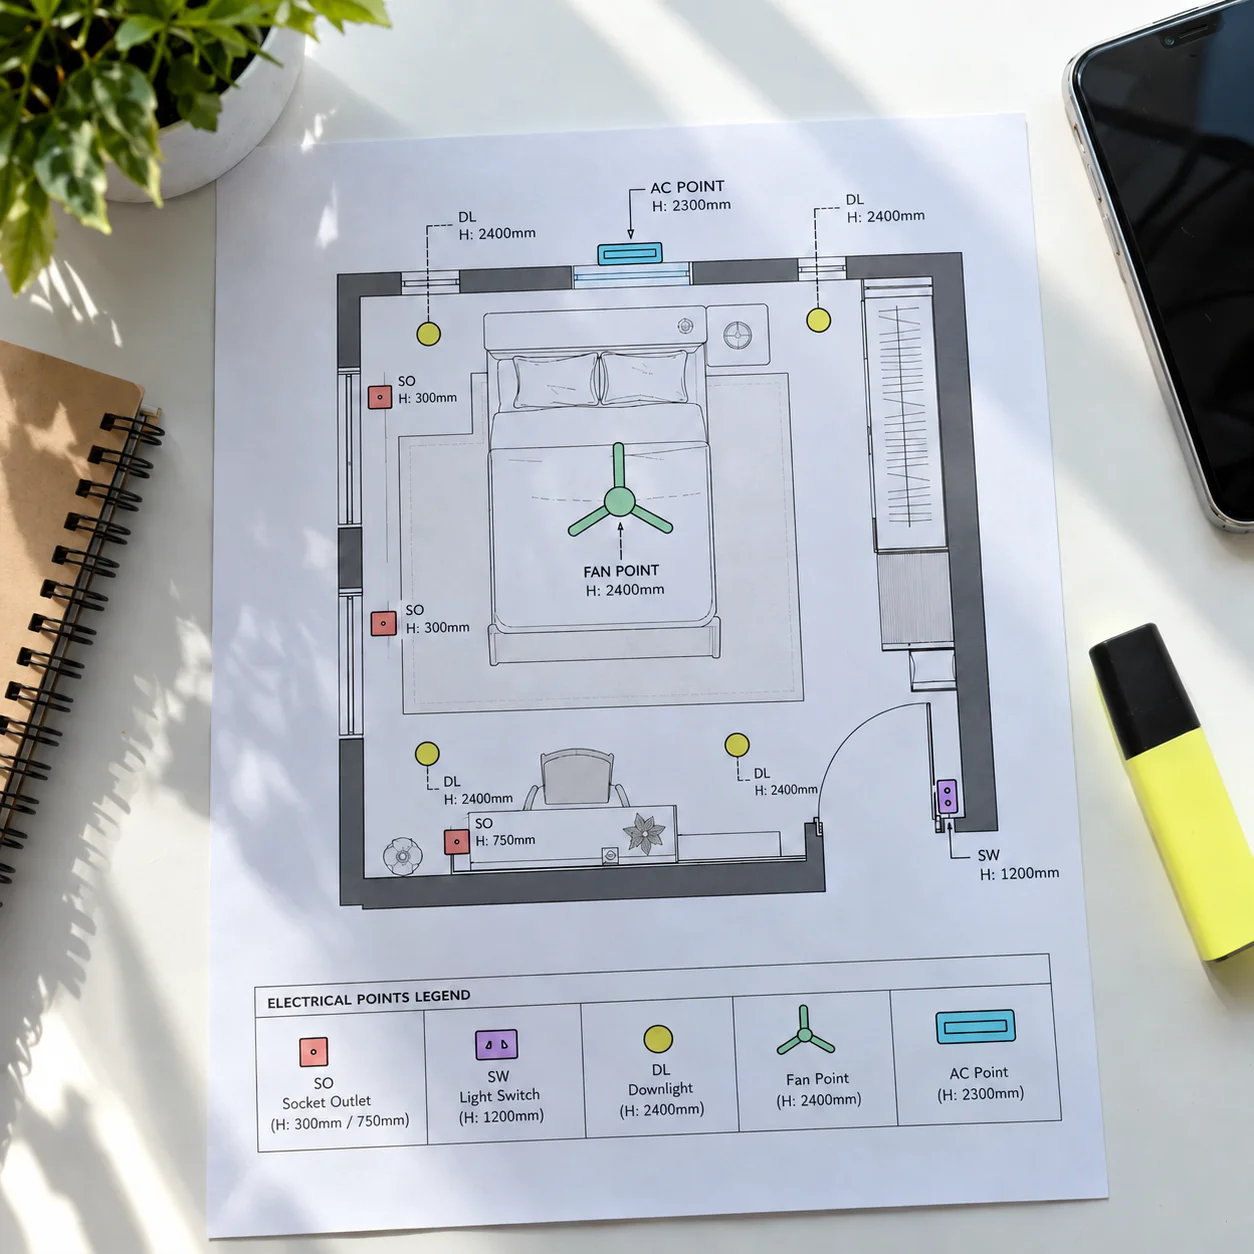
What to Check on the Proposed Layout Plan
This is where reading a floor plan pays for itself. Go room by room and check these clearances. They’re comfortable working figures for Malaysian homes, not hard rules — but if your plan falls well short, ask why.
| Space | Comfortable minimum |
|---|---|
| Main walkway / corridor | 900mm |
| Kitchen aisle (one cook) | 1000mm |
| Kitchen aisle (two cooks or island) | 1200mm |
| Clearance beside the bed | 600mm |
| In front of a wardrobe with swing doors | 900mm (doors are usually 450–500mm wide) |
| Dining chair pull-out space | 750–900mm behind the table edge |
| Toilet front clearance | 600mm |
Trace the door swings
Follow every door arc. Does the bedroom door hit the wardrobe? Does the bathroom door swing into the basin? Does the main door crash into the shoe cabinet? These clashes are obvious on paper and painful in real life.
Check carpentry depths
Wardrobes are typically 600mm deep, kitchen base cabinets 600mm, and wall cabinets 300–350mm. A shoe cabinet drawn at 450mm or more is too deep for everyday use — see our guide to shoe cabinet depth for why.
Draw your own furniture
The plan shows the furniture your ID imagined. If you’re keeping your current sofa or bringing a king-size bed (1830mm × 1905mm in most Malaysian mattress brands), measure it and sketch it onto a printout. A pencil and a ruler will tell you more than any render.
Look for the things that don’t move
Condo units come with fixed points you can’t easily relocate: RC walls, the aircon ledge, the main water riser, the gas pipe and the kitchen exhaust opening. Landed homes have their own — load-bearing walls, the main sewer line to Indah Water Konsortium connections, and roof or staircase constraints. If the new layout moves a wet kitchen to the other side of the unit, ask how the drainage gets there.

Reading the Electrical and Ceiling Plans
The electrical plan is where small mistakes add up fastest, because everything gets buried behind plaster.
- Count the points against the quotation. If the plan shows 14 new power points and the quotation prices 10, one of them is wrong.
- Check socket positions against furniture. A bedside socket hidden behind a 600mm-deep wardrobe is useless. So is a TV point at 300mm when your TV console sits at 450mm high.
- Check switch positions against door swings. Switches belong on the handle side of the door, not behind it.
- Check fan and light spacing together. Downlights placed directly above or near ceiling fan blades create a flickering shadow effect — our guide to ceiling fan and downlight placement explains the fix.
- Check ceiling drops on the RCP. An L-box or cove ceiling typically drops 250–450mm. In a condo with a 2.7m–2.9m slab height, that can make a room feel lower than you expect, especially above a tall wardrobe.
Approvals: Who Else Reads Your Floor Plan
Your floor plan isn’t just for you and your contractor.
- Condo owners submit renovation drawings to the JMB or MC for approval before work starts, along with a renovation deposit. Most will reject any hacking of structural walls or changes to the façade and aircon ledges.
- Landed homeowners need a permit from the local council (PBT) — DBKL, MBPJ or the relevant authority — for structural changes, extensions or alterations to the building’s footprint. Cosmetic works usually don’t need one, but check before you assume.
If a wall marked for hacking might be structural, ask your contractor to confirm it with the original building plans or a structural engineer. It’s a cheap question compared to the alternative. Our complete renovation checklist covers the full approval sequence.
For Carpenters and Renovators
If you’re the one producing the drawings, a few habits save arguments later:
- State the dimension datum. Note on the drawing whether dimensions are to finished or structural surfaces.
- Put heights on every electrical point. “@300AFF” on the plan beats a verbal agreement on site.
- Issue revisions clearly. Number them (Rev A, Rev B), cloud the changes and date them, so the homeowner and your site team are always looking at the same version.
- Get a signed layout before hacking. A signed, dated layout plan is your best protection when a client later asks why the island “looks smaller than the render”.
Before You Sign Off: A Floor Plan Checklist
Print the drawings at A3 if you can. Then work through this list with a pencil.
- The existing plan matches your actual unit (measure two or three walls to confirm)
- You know which walls are being hacked, and none of them is structural
- Every door swing is clear of furniture, cabinets and other doors
- Walkways and kitchen aisles meet the comfortable minimums above
- Your existing furniture fits where it’s drawn
- Appliance gaps (fridge, washer, oven) match the models you’re buying, with 10–20mm spare
- Power points are where you’ll actually use them, at the right heights
- The number of electrical points matches the quotation
- Downlights and ceiling fans don’t clash
- Wet-area floor traps and FFL drops are marked
- The drawing has a revision number and date, and you’re approving the latest one
If anything on this list is unclear, ask your ID to walk you through it on a call before you sign. A good designer will welcome it — and if you’re still choosing who to work with, our list of questions to ask your interior designer before signing the contract is a good place to start.

An evening spent with a printed floor plan and a pencil is the cheapest renovation decision you’ll ever make. Get it right on paper, and the day you collect your keys back from the contractor, every door opens cleanly, every socket sits exactly where your hand reaches for it, and the home looks like the one you approved.